The Checker Maven
The World's Most Widely Read Checkers and Draughts Publication
Bob Newell, Editor-in-Chief
Published every Saturday morning in Honolulu, Hawai`i
Noticing missing images? An explanation is here.
Summer Schedule

Pexels CC0
We'd like to remind our readers that from now through the first weekend in September, The Checker Maven is on its summer schedule, which means we generally publish one article per week instead of two.![]()
You can email the Webmaster with your comments on this article.
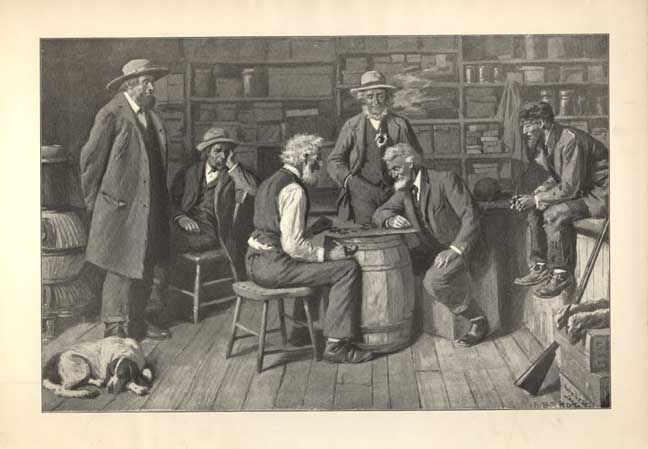
The Wyllie Online Draughts Club
Editor's Note: As of 2026, the WODC has unfortunately been off the air for some little while.
Make no mistake about it. The Wyllie Online Draughts Club, or WODC for short, is all about checkers (or draughts, if you will). It is seriously, determinedly, and single-mindedly about checkers and nothing but checkers. It is a home for the real devotee, the genuine enthusiast, the real maven. It is not a place for casuals, drop-ins, or dabblers. Not at all.
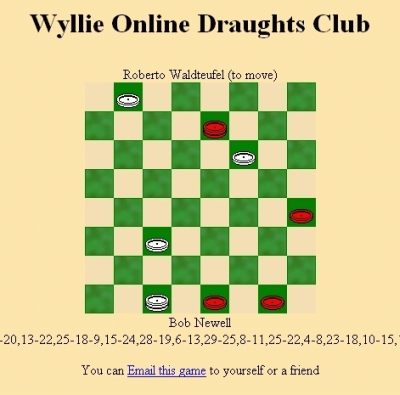
We've been playing there ourselves for a little while now and we're rather impressed.
There are game sites and there are games sites out there on the Net, and we've reviewed dozens of them on our review page. It is safe to say that there is none quite like Wyllie.
Wyllie is a "turn based" or correspondence style site. You make your move, and at some point your opponent moves (whether within minutes or days), and then you move again. You have a ten-day time allotment, plus one day per move, allowing you to schedule your play time and still keep the game moving. Wyllie also offers a "live play" or "head to head" option (limited to Windows computers). For live play, you would likely pre-arrange a meeting in the live play area and then play as you would over the board.
OK, you're saying, this is all well and good, but there are lots of turn-based and head-to-head sites out there, many of them free of charge, a few of them with hundreds and hundreds of players on-line at any given time. So what's so great about Wyllie?
We suggest you read our full review to get all the details, but the difference is that Wyllie is about checkers and checkers only, and some very strong players make it their on-line checker home. Wyllie's on-line tournaments, held more or less monthly, are likely the toughest "mail-play" style tournaments to be found anywhere.
Wyllie offers the things you want if you are really serious about your checkers: the full range of 3-move openings; 11-man ballot play for the daring; complete game records which are protected from random public view; and perhaps best of all, a strict "real name" policy which eliminates 99.99% of the potential pests and undesirables, making the site a pleasure rather than something to be tolerated.
Is WODC for you? It depends. If you like to play a casual game at a summer picnic while enjoying a few tall cool ones, perhaps not. If you're a regular Checker Maven reader and try to solve the problems each week, very likely so; likewise, if you're an enthusiastic competitor from the lower intermediate level and up, you will benefit and enjoy. Membership is not free, but neither is it expensive. You might wish to check it out and decide for yourself.
But enough commentary; as we said above, you can read the full review if you'd like all the details. Let's illustrate the caliber of play at the Wyllie site with a pair of sample tournament games, played between Welsh grandmaster Lindus Edwards and world mail-play champion Mac Banks. (We told you that there are elite players here!) Notes are by Lindus Edwards.
Black: Lindus Edwards
White: Mac Banks
| 1. | 10-15 | 23-18 | 2. | 6-10 | 18-14 |
| 3. | 9x18 | 24-19 | 4. | 15x24 | 22x6 |
| 5. | 1x10 | 27x20---A |
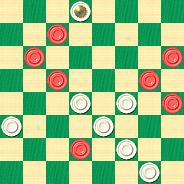
BLACK
Black to Play and Draw
B:W32,31,30,29,28,26,25,21,20:B12,11,10,8,7,5,4,3,2.
| 6. | 11-16---B | 20x11 | |||
| 7. | 8x15 | 21-17 | 8. | 12-16 | 25-22 |
| 9. | 5-9 | 17-13 | 10. | 2-6 | 32-27 |
| 11. | 4-8 | 27-23 | 12. | 16-19 | 23x16 |
| 13. | 8-12 | 26-23 | 14. | 12x26 | 30x23 |
| 15. | 9-14 | 23-19 | 16. | 15x24 | 28x19 |
| 17. | 7-11 | 29-25 | 18. | 11-15 |
Drawn.
A---A favourite line of Dr Marion Tinsley.
B---5-9 is published to draw. 11-16 looks a far easier route to me.
Black: Lindus Edwards
White: Mac Banks
| 1. | 9-13 | 24-20 | 2. | 11-16 | 20x11 |
| 3. | 7x16 | 21-17 | 4. | 5-9 | 28-24 |
| 5. | 1-5 | 25-21 | 6. | 3-7 | 23-18 |
| 7. | 16-19 | 24x15 | 8. | 10x19 | 32-28 |
| 9. | 12-16 | 17-14 | 10. | 8-12 | 26-23 |
| 11. | 19x26 | 30x23 | 12. | 6-10 | 31-26 |
| 13. | 10x17 | 21x14 |
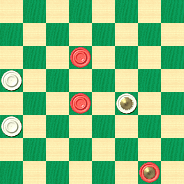
BLACK
Black to Play and Draw
B:W29,28,27,26,23,22,18,14:B16,13,12,9,7,5,4,2.
| 14. | 7-10---A | 14x7 | |||
| 15. | 2x11 | 28-24---B |
Drawn.
A---A saving move!
B---The draw is now simple as follows: 16-20 24-19 11-16 29-25 9-14 18-9 5-14 25-21 13-17 Drawn.![]()
You can email the Webmaster with your comments on this article.
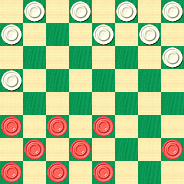
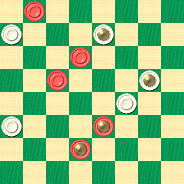
White to Move and Draw, Cowboy

Openclipart CC0
Most stroke problems have as terms that one side or other is to move and win. In this month's problem, though, we're only looking for a draw, so obviously, the problem must be easier than most, wouldn't you say?
Perhaps by now you know us better than that! Today's problem will require your best efforts at visualization in order to earn the draw in the following situation.
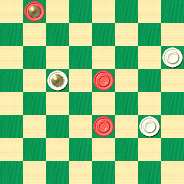
WHITE
White to Play and Draw
W:W16,19,22,25,K26,30,32:B2,6,7,10,13,15,17,18,24,K31.
Just don't be too quick on the draw yourself; give the problem a try before clicking on Read More for the solution.![]()
You can email the Webmaster with your comments on this article.
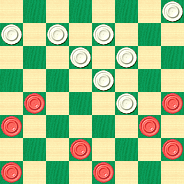
Just Ask Your Mom

With permission of model
Mother's Day this year is celebrated on Sunday, May 14, 2006, the day after this article is due to be published, and we hope you've remembered your Mom in whatever way might be appropriate.
While we can't really say that today's feature problem is directly related to Mother's Day, it's a real teaser, and if you're stuck, we suggest that you just ask Mom for help.
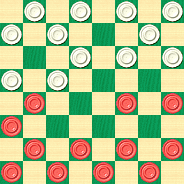
WHITE
White to Play and Win
W:W5,K7,K16,19,21:B1,10,14,K23,K26.
Forces are even, but White has a man stuck in the dog hole. What is to be done?
Solve the problem, and check your solution with Mom. If she plays coy, though, you can always click on Read More for the answer.![]()
You can email the Webmaster with your comments on this article.
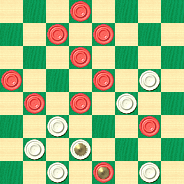
The Goose Walk

Public Domain Pictures CC0
Today's installment from Willie Ryan's Tricks Traps & Shots of the Checkerboard includes the well known "Goose Walk" trap. No doubt you're familiar with it, so try your luck and see if you can work it out over the board. The lesson is rounded out with a trap in the Ayrshire Lassie opening. Clicking on Read More is no trap, though; it will show you Willie's solutions to these interesting and practical positions.
Here's what Willie has to say.
The Goose Walk
Still another first-round knockout that has tripped many a tyro is the deady Goose Walk, a favorite coup de grace of the experts for over 150 years. It is also known as the "Old Farmer," but by any name it's dynamite to the neophyte. Here's the run-up:
11-15 22-18---A 15-22 25-18 8-11 29-25 4-8 24-20 10-15 25-22 12-16 27-24---B. See the diagram.
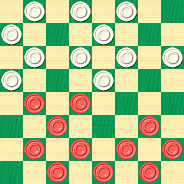
BLACK
Black to Play and Win
B:W32,31,30,28,26,24,23,22,21,20,18:B16,15,11,9,8,7,6,5,3,2,1.
A---This trade-off identifies the single corner opening. More play has been published on it than on any other lead-off. It makes an even game.
B---This and 28-24 lose, allowing the Goose Walk, first shown by William Payne in 1756. The correct moves are: 21-17, 8-12, 17-13, etc.
An Old Lassie Catch
Ever since 1800, champions have been baiting beginners with the snap-trap on the Ayrshire Lassie opening outlined on the next page. Every learner has to become familiar with the basic ideas behind these elementary snares if he hopes to reach the expert class.
11-15 24-20 8-11 28-24 4-8 23-19 15-18 22-15 11-18 26-22 7-11 22-15 11-18 30-26 8-11 26-22---A See the diagram.
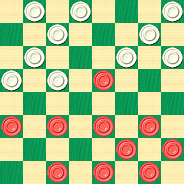
BLACK
Black to Play and Win
B:W32,31,29,27,25,24,22,21,20,19:B18,12,11,10,9,6,5,3,2,1.
A---The bad one. The correct moves are: 25-22, 18-25, 29-22, 11-15, 27-23, 9-13, 32-28, 6-9, 19-16, 12-19, 23-16, 9-14, 24-19, 15-24, 28-19, 2-6, 26-23, 10-15, 19-10, 6-15, 16-11, 1-6, 31-27, 6-9, 11-7, 3-10, 27-24, 15-18, 22-6, 14-17, 21-14, 9-27, ending in a draw.![]()
You can email the Webmaster with your comments on this article.
Key Themes Is Now Available

We are pleased and privileged to announce the release of a new electronic edition of Richard Pask's classic Key Themes. You can download it immediately here, or else visit the Richard Pask page as linked in the right-hand column. The book is in PDF format for easy and universal access, and is yours for the taking, completely free of charge.
Key Themes presents 90 pages of critical mid-game knowledge, featuring 25 "key themes" which arise often in play. Study of this material by the aspiring player will provide untold benefits in improved playing strength.
This electronic edition is not just a set of scanned images, but a newly typeset edition, with large, clear diagrams and an attractive layout.
We plan to release an electronic edition of Mr. Pask's Key Endings toward the end of 2006; in 2007 we will begin the ambitious task of publishing electronic editions of all of Mr. Pask's landmark opus, Solid Checkers. Our continued thanks and appreciation go to Mr. Pask for his generosity in making his fine material available to the checker-playing public.
There is no second problem in today's edition of The Checker Maven as we invite you instead to download Key Themes and spend some time in pure enjoyment. (Full disclosure warning: hours are likely to speed by unnoticed!)![]()
You can email the Webmaster with your comments on this article.
Speedy Delivery

With the traditional Mother's Day celebration just around the corner, you'll need the services of Speedy Delivery to get your flowers there on time! Similarly, you'll need to be pretty speedy to beat our relentless time clock on this month's pair of speed problems.
The first one is quite easy. The second one requires fast thinking and good visualization. We'll give you 15 seconds on the first one and a full minute (!) on the second. Click on the links below to show the problems and start the clock.
Whether or not you can deliver the solutions, clicking on Read More will speedily show you how it's done.
May 2006 Speed Problem 1 (easy)
May 2006 Speed Problem 2 (medium)
And now here's an off-the-wall trivia question: who played the character of Mr. McFeely (the Speedy Delivery man) on the celebrated Mr. Rogers Neighborhood television show? There's a reason why we ask.![]()
You can email the Webmaster with your comments on this article.
A Paisley Problem

Needpix.com CC0
We're not returning today to the famed and troubled sixties, those times of tye-dyed shirts, paisley trousers, lava lamps, and much more which we shan't explore here. Instead, we're going back a full hundred years to the days of J. D. Janvier, who named the go-as-you-please opening 11-16 24-19 8-11 "The Paisley," without the slightest foreknowledge of peaceniks, Haight-Ashbury, or bell-bottoms. (We understand that Mr. Janvier was, much more prosaically, instead making reference to a town in Scotland.)
Here's some interesting published play in the Paisley:
| 1. | 11-16 | 24-19 | 2. | 8-11 | 22-18 |
| 3. | 4-8 | 18-14 | 4. | 9x18 | 23x14 |
| 5. | 10x17 | 21x14 | 6. | 16x23 | 27x18 |
| 7. | 12-16 | 28-24 | 8. | 8-12 | 26-23 |
| 9. | 16-20 | 31-27 | 10. | 6-9 | 25-21 |
| 11. | 1-6 | 29-25 | 12. | 11-16 | 24-19 |
| 13. | 6-10 | 30-26 | 14. | 10x17 | 21x14 |
| 15. | 7-10 | 14x7 | 16. | 3x10 | 26-22 |
| 17. | 9-13 | 25-21 | 18. | 2-6 | 18-15 |
| 19. | 10-14 | 22-18 | 20. | 5-9 | 15-11 |
| 21. | 13-17 | 11-7 | 22. | 17-22 | 7-2 |
| 23. | 22-26 |
And so we arrive at the following position.
WHITE
White to Play and Win
W:W32,27,23,21,19,18,K2:B26,20,16,14,12,9,6.
Without turning to your books of published play, can you, fully on your own, find the White win? Even better, can you find Black's losing move in the play above, and correct it? To help in following the play, you can click here for an on-line animation.
If the effort frays your bell-bottoms or ruffles your Paisley trousers, clicking on Read More will bring you the answers quicker than you can light your lava lamp.![]()
You can email the Webmaster with your comments on this article.
Just a Little Bit of Difference

Sometimes, just a little bit of difference is all it takes... and that's the subject of today's installment in our continuing series of lessons in Checker School.
Here's the first situation we'd like to have you consider:
WHITE
White to Play and Win
W:W13,K19,21:B10,18,K32.
Forces are even, but the Black man on 10 is decidedly exposed, and we'd have to give the edge to White.
But now, take a look at this one:
BLACK
Black to Play and Draw
B:W21,K19,9:BK32,18,10.
Not much difference, is there? It's as if White had played 13-9 in the first diagram, not at all an illogical move on the face of it, and thereby changed a win into a draw!
Checkers is indeed a subtle game, where little differences can mean a lot. Make a difference for yourself by solving these two problems, and then clicking on Read More to see the solutions, with detailed notes and a sample game.
[Read More]You can email the Webmaster with your comments on this article.
The Six Move Blitz

Here are two more entries from Willie Ryan's classic Tricks Traps & Shots of the Checkerboard, as we continue our long-term project of republishing the entire book for your entertainment and edification. Let's hear Willie in his own words.
A Hole in The Dyke
The struggling tyro seems to have an unexplainable "aptitude" for walking into the following shot with his eyes wide open. I have scored with it innumerable times. To arrive at the position on the diagram, move:
11-15 22-17 15-19---A 23-16 12-19 24-15 10-19 25-22 8-11 29-25---B 11-15 27-23---C.

BLACK
Black to Play and Win
B:W32,31,30,28,26,25,23,22,21,17:B19,15,9,7,6,5,4,3,2,1.
A---Forms the Dyke, a standard opening.
B---A very weak move, but drawable; 27-23 or 17-13 would be better.
C---Hooked! The following series of moves draws narrowly and corrects important play by F. Teschelheit: 17-13, 4-8, 21-17*, 7-10, 27-23, 8-12, 23-16, 12-19, 31-27* (the only move to draw, correcting Teschelheit, who gives 32-27 to a black win), 2-7 (if 3-8, 17-14 draws; if 9-14, 27-23 draws), 27-23, 19-24, 28-19, 15-24, 23-18, 7-11, 17-14, 10-17, 25-31, 3-7, 21-14, 24-28 (11-16, 14-10, white wins), 22-17, 11-16, 26-22, 16-19, 30-26, 7-11*, 14-10, 6-15, 13-6, 1-10, 18-14, 19-23, etc., drawn. Wm. F. Ryan.
A Six-Move Blitz
Among the most effective six-move killers is this well-known example on the Denny opening. Set up the pieces for play. Now move 10-14, 23-19, 11-16, 26-23, 9-13, 20-24---A, and we get the layout of pieces pictured here.
BLACK
Black to Play and Win
B:W32,31,30,29,28,27,25,23,22,21,20,19:B16,14,13,12,8,7,6,5,4,3,2,1.
At A, instead of 24-20, white can get a good game by 22-17, 13-22, 25-9, 5-14, 29-25, 7-11, 25-22 (not 24-20, 14-18), 6-10, 22-18, 1-5, 18-9, 5-14, 30-25, 11-14, 25-22, 16-20, 22-17, 8-11, 17-13, 2-6, 31-26, 12-16, 19-12, 11-16, 13-9, 6-13, 26-22, 16-19, 23-16, 3-7, 22-18, 15-22, 16-11, 7-16, 24-19, 16-23, 27-9, 10-15, 9-6, 22-26, 6-2, 15-19, 32-27, 4-8*, 12-3, 26-31; resulting in a draw.
When you've blitzed these problems, and are sure there are no holes in your solutions, you can click on Read More to see how Willie worked these out.![]()
You can email the Webmaster with your comments on this article.
The Checker Maven is produced at editorial offices in Honolulu, Hawai`i, as a completely non-commercial public service from which no income is obtained or sought. Original material is Copyright © 2004-2026 Avi Gobbler Publishing. Other material is public domain, AI generated, as attributed, or licensed under CC1, CC2, CC3 or CC4 and the various CC options. Information presented on this site is offered as-is, at no cost, and bears no express or implied warranty as to accuracy or usability. You agree that you use such information entirely at your own risk. No liabilities of any kind under any legal theory whatsoever are accepted. The Checker Maven is dedicated to the memory of Mr. Bob Newell, Sr.