The Checker Maven
The World's Most Widely Read Checkers and Draughts Publication
Bob Newell, Editor-in-Chief
Published every Saturday morning in Honolulu, Hawai`i
Noticing missing images? An explanation is here.
Fifth Position

If you're a ballet student of any standing, you've certainly encountered "fifth position," as shown above. It's one of the basics that every aspiring ballet dancer must learn.
Checkers, too, has Fifth Position, and it requires mental effort similar to the physical effort required for ballet's position of the same name. Yes, we've seen Fifth Position in our columns before, but perhaps not to quite the depth of today's lesson in Checker School.
Here's the basic premise.
BLACK
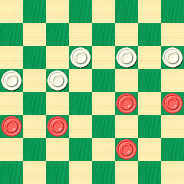
Black to Play and Draw
B:W23,22,21,20,19:B14,13,12,11,6.
Even if you've done it before, it's worth another try. Solve it, then click on Read More to see the solution and the heart of this study: six sample games that lead to Fifth Position.![]()
Capers on the Kelso, Part 4

During your school days, did you ever "cut a caper" like the kids above are doing? They seem to really be enjoying their dance class.
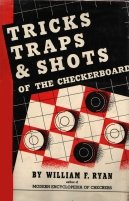
This week continues our equally enjoyable checker series, Capers on the Kelso, taken from Willie Ryan's famous Tricks Traps & Shots of the Checkerboard. We're deep into a variation off the main line in which Willie has highlighted an interesting problem-like position.
The uncommented run-up follows below. For complete notes, see the previous columns in this series.
| 1. | 10-15 | 22-18 | |
| 2. | 15x22 | 25x18 | |
| 3. | 6-10 | 29-25 | |
| 4. | 11-15 | 18x11 | |
| 5. | 8x15 | 25-22 | |
| 6. | 4-8 | 21-17 | |
| 7. | 9-13 | 23-18 | |
| 8. | 7-11 | 26-23 | |
| 9. | 5-9 | 24-20 | |
| 10. | 1-5 | 28-24 | |
| 11. | 9-14 | 18x9 | |
| 12. | 5x21 | 23-19 | |
| 13. | 2-6 | 27-23 | |
| 14. | 3-7 | ||
WHITE
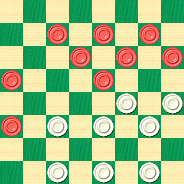
White to Play and Draw
W:W32,31,30,24,23,22,20,19:B21,15,13,12,11,10,8,7,6.
White is a piece down, but the draw is there, although White will have to make a number of star moves and "toe the line" pretty closely.
Is this too big a caper to pull off, or can you do it? Give it a couple of turns, and then click on Read More to see the solution and notes.![]()
Traffic Jam

Paradise has a price. A surprising fact is that Honolulu traffic is second only to Los Angeles in the United States. The photo above tells it all as we see an all too common jam-up on the H1 highway.
We've just given you a big hint, by the way, to the solution of today's Checker School problems. And here's another hint: solve the second one first. These aren't especially easy, so be patient and persevere, just as you would have to do in a traffic jam.
WHITE
BLACK
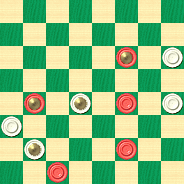
Black to Play and Win
B:W21,K15,13,12,K8:BK22,K16,14,6,3.
WHITE
BLACK
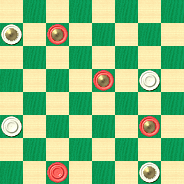
Black to Play and Win
B:WK28,17,12,K1:BK27,K18,K9,3.
Don't get yourself in a jam; solve the problems and then jam that mouse down on Read More to see the solutions, sample games, and explanatory notes.![]()
Capers on the Kelso: Part 3
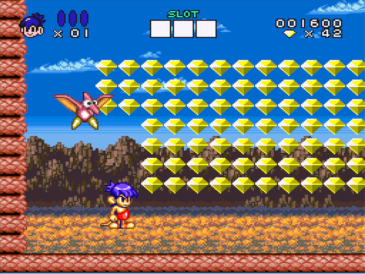
What does a screenshot from an arcade-style video game have to do with checkers?
We challenge you to identify the source of the screenshot, for therein lies the answer.
We continue with our multi-part excursion into the Kelso with the third installment, taken from Willie Ryan's Tricks Traps & Shots of the Checkerboard. Today we cover the beginning of Willie's Variation 1.
The run-up is short:
10-15, 22-18, 15-22, 25-18.
Now we continue with Willie's text:
Variation 1
| 6-10---A | 8-15 | 9-13 |
| 29-25---B,3 | 25-22 | 23-18 |
| 11-15 | 4-8 | 7-11*---D |
| 18-11 | 21-17---C | 30-25 |
BLACK
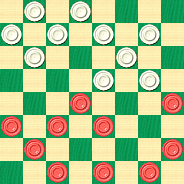
Black to Play and Win
B:W32,31,28,27,26,25,24,22,18,17:B15,13,12,11,10,8,5,3,2,1.
A---"Black has three good moves to start with. Most of our leading masters have shown a preference for 9-13 here, but 6-10 (an earlier favorite) and 11-15 are just as good. The principal advantage of the text defense (6-10) is the fact that it may be applied also to another two-move opening: 9-13, 22-17, 13-22, 25-18, 6-9, which develops the same position.
B---Some players object to 6-10 at A because of the 18-14 'bust' at this juncture, and others dodge 6-10 because of the situation arising at C (21-17) in trunk. The analysis in this lesson is offered to prove that both objections are unfounded. See Variation 3 for play on 18-14.
C---This move has long been regarded as the major stumbling block of the 6-10 defense. My innovation at D deflates this highly rated attack.
D---This odd move improves on more published play than you can shake a stick at. The accepted move in the past has been 8-11, as used in the Stewart-Banks match, giving white a strong game. I had this 7-11 improvement cooked up for Walter Hellman at the 1939 Tacoma National Tourney, but he avoided the whole line by playing 18-14 at B."
3---Variation 3 will be the subject of a future column---Ed.
Click on Read More to see the solution and additional notes.![]()
Long Winter School Days

This column will appear on January 10, when the holidays are behind us and school is back in session, with long weeks to go before spring break. So it seems appropriate that today's Checker School column be, well, a long one, with no less than three problems to solve, and then four sample games and a page of detailed notes.
If it seems like a lot, it is, but the road to checker mastery is paved with checker studies, and if you can solve these, you've come a long way. All three of today's positions are inter-related, as you'll see when you work on them. Diagram 2 is Allen's Win and Diagram 3 is Robertson's Draw.
BLACK
WHITE
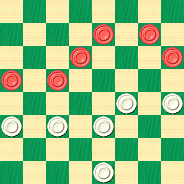
White to Play, Black to Draw
W:W31,23,22,21,20,19:B14,13,12,10,8,7.
BLACK
WHITE
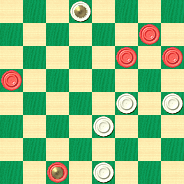
White to Play and Win
W:W31,23,20,19,K2:BK30,13,12,11,8.
WHITE
BLACK
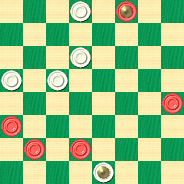
Black to Play and Draw
B:W31,23,20,19,K2:BK30,13,12,8,7.
Just to be fair, we'll let you know that the first diagrammed position leads to both the second and third, depending on the moves chosen.
Study hard and find the solutions, then click on Read More to see the solutions, sample games, and detailed notes.![]()
A Lot of Work

The two positions presented in today's Checker School column will present you with a lot of checker-related work, for not only are there two problems to be solved, there are four sample games and more than twenty explanatory notes to go through.
But good work bears its rewards, and if you take the time to study all of this material, then unless you're already a grandmaster, you'll definitely become a better player.
WHITE
BLACK
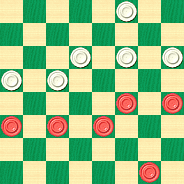
White Plays, Black Wins
W:W30,23,22,21,20,19:B14,13,12,11,10,1.
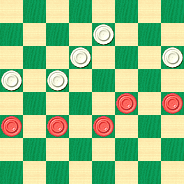
J. DRUMMOND
WHITE
BLACK
Black to Play and Win
B:W26,23,21,20,19:B14,13,12,11,10.
Work it all out, then click on Read More to see the solutions an a wealth of supplementary material.![]()
Capers on the Kelso, Part 2
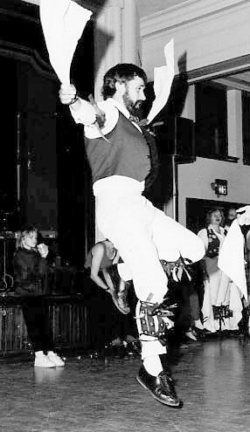
The assorted meanings of the word "caper" intermingle in our columns with various "capers" on the 10-15 Kelso opening. The photo above is of a Morris Dancer executing a caper, or leap.
Back in the world of checkers, though, we continue our series drawn from Willie Ryan's Tricks Traps and Shots of the Checkerboard. Recall that Willy was looking into variations ("capers") that occur some little way into the opening. For the sake of convenience, we'll repeat the full run-up (without the notes).
| 1. | 10-15 | 22-18 |
| 2. | 15-22 | 25-18 |
| 3. | 11-15 | 18-11 |
| 4. | 8-15 | 21-17 |
| 5. | 4-8 | 17-13 |
| 6. | 9-14 | 29-25 |
| 7. | 6-10 | 24-20 |
| 8. | 1-6 | 28-24 |
| 9. | 8-11 | 23-19 |
| 10. | 15-18 | 26-23 |
| 11. | 14-17 | 23-14 |
| 12. | 17-21 | 32-28 |
| 13. | 10-17 | 19-16 |
| 14. | 12-19 | 24-8 |
| 15. | 3-12 | 28-24 |
| 16. | 7-11 |
Willie now goes on in Note P, "Mr. Banks saw his chance for a draw and went after it. However, he grossly underplayed his position. I was in trouble. After the game I pointed out to him that he could have worried me by playing 27-23, leaving black in the plight indicated on the diagram shown on the next page. After a few trial runs, I managed to demonstrate a narrow draw for black, which is replete with tactical brilliancies."
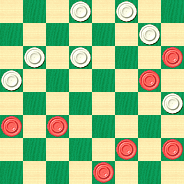
This brings us to our problem position (after 27-23).
BLACK
Black to Play and Draw
B:W31,30,25,24,23,20,13:B21,17,12,11,6,5,2.
The problems in the latter part of Willie's book certainly aren't easy, but they are good, and this is no exception. Cavort with it a little and then scoot your mouse to Read More to see the solution and notes.![]()
Solve This, Not That

In today's Checker School column, it looks like there are two problems, and that's sort of true; what happens is that the first problem evolves into the second. So you might be well advised to take on the second problem first, and then go back and see how the first problem can indeed become the second.
Confusing? Just take our word for it and solve the problems in reverse order.
WHITE
BLACK
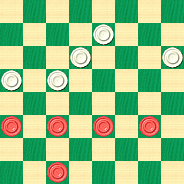
Black to Play and Win
B:W26,23,21,20,19:B12,11,10,9,3.
WHITE
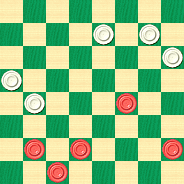
BLACK
Black to Play and Win
B:W26,25,21,20,16:B14,8,7,5,3.
What's fascinating about this is that at a quick glance, the first problem actually looks like it might be simpler!
Solve one or both, or neither(!) as your inclination and checker prowess allow, but definitely click on Read More to see the solutions, detailed notes, and a sample game.![]()
An Elegant Swan

There's no doubt that the swan in the photo above is elegant and beautiful.
Can we say the same about today's entry in our Checker School series? As beautiful a game as checkers can be, it's hard to compare it with Mother Nature. It's like apples and oranges. Or mayber checkers and swans.
In any case, the study below is attributed to Swan and Adamson, and it's quite a good one.
WHITE
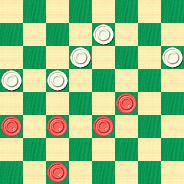
BLACK
Black to Play and Win
B:W26,23,21,20,19:B14,12,11,10,3.
The solution is fairly long, but as we're fond of saying, quite instructive. Give it a try; wing it if you have to, and then glide your mouse to Read More to see the solution, with a sample game and detailed notes.![]()
The Fugitive Companion
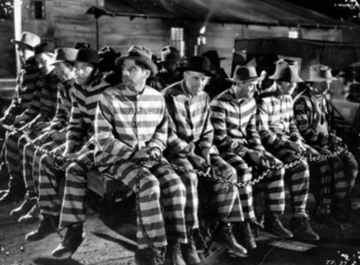
It looks like these fugitive companions didn't get very far. They're all on their way back to the big house, and they'll probably stay there for a long time.
Today's Checker School column features a pair of related problems, neither of them especially easy, but as usual, quite instructive. You'll see where the title comes from when you work them through.
F. DUNNE
WHITE
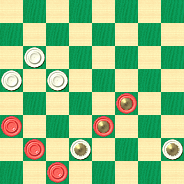
BLACK
Black to Play, White Draws
B:W24,20,19,K7,K5:BK14,12,K10,8,3.
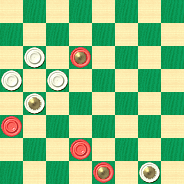
Diagram Two
McKEAN - WARDROP
WHITE
BLACK
Black to Play and Win
B:W24,20,19,K16,K1:BK23,12,7,K2.
Can you solve these problems, or will you just flee, with or without a companion? While not easy, they may not be as hard as you might think at first glance. Recapture your solutions and then click on Read More to see a sample game and the solved problems with detailed notes.![]()
The Checker Maven is produced at editorial offices in Honolulu, Hawai`i, as a completely non-commercial public service from which no income is obtained or sought. Original material is Copyright © 2004-2026 Avi Gobbler Publishing. Other material is public domain, AI generated, as attributed, or licensed under CC1, CC2, CC3 or CC4. Information presented on this site is offered as-is, at no cost, and bears no express or implied warranty as to accuracy or usability. You agree that you use such information entirely at your own risk. No liabilities of any kind under any legal theory whatsoever are accepted. The Checker Maven is dedicated to the memory of Mr. Bob Newell, Sr.

