Learning Checkers Opening Principles – A Clear Example
On my companion page about how beginners can quickly become more effective checker players, using what I think is a new method (and for which I modestly take credit!) I talked about the "opening study" controversy. Should beginners study openings, or not?
My conclusion was that a certain amount of knowledge is important, as long as that knowledge is based on principles rather than pure rote memorization (which is, in fact, harmful and confusing). I think an example is worthwhile as an illustration.
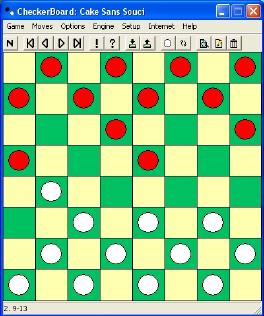
Let's take an opening known as The Switcher. It is supposed to be good for Red and bad for White, and in fact, that is indeed the case. The Switcher comes about after 11-15, 21-17?, 9-13! and looks like this:
Well, there's something to learn right away, and that is as White don't play 21-17 in response to 11-15! The general principle is not to allow Red to get a grip on your single corner, which is what happens here with 9-13. (The reason the opening is called The Switcher is that it can come about from the Edinburgh with 9-13, 21-17? 11-15! but I digress unnecessarily.)
Now, if you look in those opening books that you either should or should not study as a beginner, depending on viewpoint, every book gives White's next move as 25-21*. It is "starred" or called a "star move" because it is believed to be the only possible move to save the situation. Well, as a beginner myself, I must say that I didn't get it at all! I mean, since this situation supposedly cramps White's single corner (and if you play the White side you will actually feel it to be so), why not free up the single corner with exchanges? Why not play 22-18 and clear things up with the two exchanges this forces? What's so great about 25-21 that it's listed as a star move? It was a telling sign that 22-18 wasn't listed as an optional line or even mentioned in any of the several opening books I consulted, but......
Yes, this is a beginner talking, that's clear from what I'm saying. OK, but allow me the fact that I still didn't get it. After 22-18, 15x22, 25x18, 13x22, 26x17 you get this:
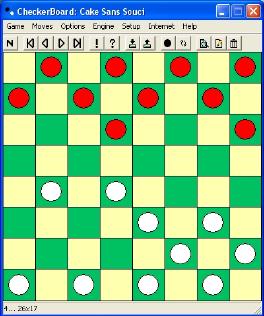
This is, apparently, a win for Red. But why? My beginner's viewpoint is that the White single corner has been freed up, and the board cleared a bit, leaving considerable freedom for the White pieces. What's wrong with this viewpoint?
Of course, I didn't have any idea, and so I gave things over to the computer, letting Cake San Souci autoplay the game from this position. I set it to 15 minutes per move on a 2 Ghz computer, ensuring that plenty of really deep analysis would get done. So, hours later, after Cake decided on these moves:
8-11 30-26 4-8 18-15 11x18 23x14 10-15 29-25 8-11 27-23 15-18 24-20 18x27 32x23 6-10 31-27 1-6 28-24 10-15 25-21 6-10 17-13 10x17 21x14 12-16 26-22 2-6
we get this:
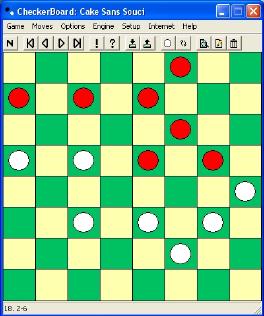
and it's clear even to me that, with White to move, Red has won the game. White has no viable moves left. 22-17 is answered by 7-10, 14x7, 3x10 and then White loses a piece (or two) no matter what move is made. 23-18 loses as well. White is doomed.
Well, I played through all the intermediate moves that Cake suggested, and suffice it to say that my understanding of them was, uh, somewhat limited. But the final result is as clear as can be. The center break that I thought was so clever earlier in the game is indeed a loser. But why?
To understand this, let's go back to here, the position I thought was so great for White, but really was a loss:
I really didn't get it until I picked up Derek Oldbury's Move Over, a free book that I mention elsewhere as being one of the few checker books that are about principles. And the answer became clear: White is overdeveloped. And overdevelopment in the very early game is not a good thing, because-- guess what-- you run the danger of running out of moves. And that's exactly what happened. Oldbury scores development like this: count one for each man on the first rank, two for each man on the second rank, and so forth. If you do this in the position above, you get 22 for White and 18 for Red, each of which has 10 men on the board. Oldbury suggests that an early game development lead of four or more, with 10 or more men on each side remaining, is likely to lose. Guess what! He's right!
So Red's strategy is to make White run out of moves. White has to try to open the position with exchanges. Again, while I don't understand every move that Cake came up with, this is just the way it worked. Red ran White out of moves and that was the end.
Now, thinking back to some on-line or computer games I've played, I can recall numerous times when I've had men out front and the opponent has had this nice compact, rearward position early in the game. And I lost most of these, or at least struggled like mad to try to rescue the game. Finally, I know why.
I learned the principle, something that a book of moves and variants would never have shown me. You can bet I'll be on the alert for this sort of thing in the future!
(Now, for those of you advanced players out there who are now saying, "Duh! How obvious! What a dodo for not knowing that in the first place!" ... well, to a beginner this is anything but obvious. Would that there were more books like Move Over which assume little and teach basic principles!)
Bob Newell, Santa Fe, New Mexico, last updated 5 Mar 2005