Checker School: All Kings

The picture above shows the Battle of Kings Mountain from the American Revolution. It was a common thing back in the day for battles to involve locations named for kings, be fought under kings, and at times even fought by the kings themselves. A battle of kings is certainly common in our game of checkers, and in this month's Checker School column, we look at a massive battle of five kings against four.
That would seem to be simple, wouldn't it? After all, the side with five kings has greater forces and ought to win. But it may (or likely may not) surprise you to know that many untrained checker players have trouble with two kings defeating one, and absolutely no idea what to do with three kings against two, let alone the larger arrays of four against three or five against four. You have to know what you're doing and in the larger settings patience and technique make up the order of the day.
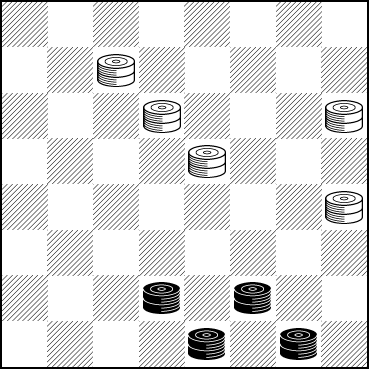
Here's a five against four situation. Are you up to winning it?

WHITE
White to Play and Win
W:WK6,K10,K12,K15,K20:BK26,K27,K31,K32
Give this position a royal effort and then click on Read More to see one possible solution and some additional commentary.![]()
Solution
One solution is as follows. It's a combination of human and computer moves. There are other solutions. See if you can find a shorter one, or find a flaw in our solution; let us know if you do.
In the following play, Black does everything possible to delay trading off pieces and making the win simpler for White.
| 1 | ... | 6-2 |
| 2. | 26-30 | 2-7 |
| 3. | 30-26 | 7-11 |
| 4. | 26-22 | 11-16 |
| 5. | 32-28 | 10-7 |
| 6. | 22-25 | 7-11 |
| 7. | 25-30 | 16-19 |
| 8. | 30-26 | 12-16 |
| 9. | 28-32 | 19-24 |
| 10. | 26-23 | 24-28 |
| 11. | 23-26 | 16-19 |
| 12. | 27-23 | 19-24 |
| 13. | 23-27 | 15-19 |
| 14. | 26-22 | 19-15 |
| 15. | 22-25 | 15-18 |
| 16. | 25-30 | 11-15 |
| 17. | 30-26 | 15-10 |
| 18. | 26-30 | 10-14 |
| 19. | 30-25 | 14-17 |
| 20. | 25-30 | 18-22 |
| 21. | 30-26 | 17-13 |
| 22. | 26x17 | 13x22 |
and White now wins a 4x3 ending.
Andrew J. Banks, author of Checker Board Strategy, the book from which this problem was taken, offers what he feels to be simple advice starting from the problem position.
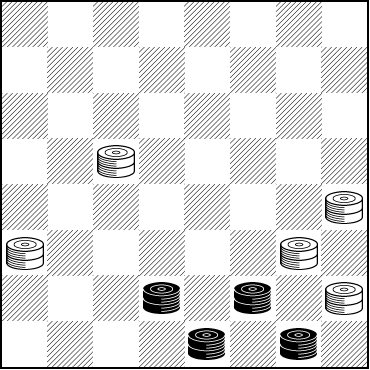
"... Black can merely move around aimlessly while you move White's five kings as follows ... Bring White King from 6 by way of 2 and 16 to 28, then White King from 10 by way of 16 to 24 --- Black cannot prevent this ... Bring White King from 12 to 21 and White King from 15 to 14 resulting in the following diagram.

WHITE
White to Play and Win
W:WK14,K20,K21,K24,K28:BK26,K27,K31,K32
21-25, 26-30---1, 14-18, 30-21, 18-22, W. Wins.---2
1---26-23 allows an exchange by 24-19.
2---For instance 27-23 24-27 31-24 20-18.
It's nice in theory but it might or might not fully work out depending upon Black's play. As nearly as we can tell White can't truly force the position above. Besides, there are traps and pitfalls, and as the White kings force back the Black kings, White could even blunder into a shot or two which would give Black a draw or even a win. It's an ending worthy of careful study and we invite you to use your computer to do so.
In fact, though, we find Richard Pask's advice, as given in his celebrated book Checkers for the Novice, to be the wisest of all: "Better still however, would be to not let your opponent get so many kings in the first place."
You can email the Webmaster with comments on this article.