The Checker Maven
Jump to navigationThree by Mac

stockvault.net CC0
For better or worse, today's Checker School episode isn't about a three-decker cheeseburger put out by a fast food establishment. Instead, it's a triple-decker set of positions by J. B. Macindoe, a fascinating progressive endgame study.
First, try the original:
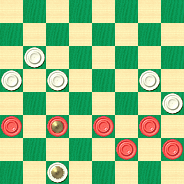
BLACK
Black to Play and Win
B:W24,20,19,17,13,K3:B12,K11,10,9,6,5.
If you are really good and you got it right, you went to this second configuration at some point:
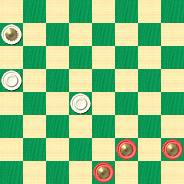
BLACK
Black to Play and Win
B:WK28,20,15:BK6,K5,K2.
And if you stayed on track (a bit easier this time), you came up with the following third situation:
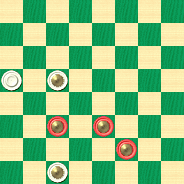
BLACK
Black to Play and Win
B:W20,K19,K3:BK11,K10,K6.
We suggest that in solving the problem, you start with the first diagram; if that's (as we expect) a tough piece of meat, try the second diagram; and if you can't slice that particular piece of cheese, see if you can shred the lettuce in the third diagram. But to digest the solutions, no secret recipes are needed; clicking on Read More will serve up the answers.![]()
Solutions
Here are Ben Boland's solutions, commentary, and example game.
Diagram No. 1: 11-15---A, 3-7, 9-14, 7-3, 14-21, 3-7, 21-25, 7-14, 15-11, 14-18, 6-10, 18-23, 25-30, 23-27, 11-15*, 27-32, 30-26, 32-27, 26-22, 27-23, 22-17, 23-27, 15-18, 27-32, 17-14, 13-9, 10-15, 19-10, 14-7, 9-6, 7-10*, 6-1, 5-9, 32-28, 10-7, 1-6, 9-13, 6-2, 7-11, 2-6, 18-14, 28-32, 13-17, 32-27, 17-21, 27-23, 21-25, 23-26, 11-15, 6-1, 14-17*, 1-6, 25-30, 26-23, 17-14, 6-1, 30-25, 23-26, 14-9, 26-23, 25-21, 23-27, 21-17, 27-32, 17-14, 32-28, 15-11, 1-5, 9-6, 5-1, 6-10, 1-5, 12-16, 5-1, 10-15, 28-32, 14-10, 1-5, 16-19, 32-28, 10-14, 5-1, 11-7, 1-6, 7-2, 6-1, 14-17, 1-5, 2-6, 5-1, 6-9, 1-5, 17-14, 5-1, 9-5, 1-6, 14-10*, 6-1, 10-7, 1-6, 5-1, 6-9, 7-2, 9-14, 1-5, 14-10, 15-6, 24-15. Forms the second diagram.
Diagram No. 2: 5-9, 28-24, 9-14, 15-11, 6-10, 24-19, 14-18, 11-8, 18-15, 19-16, 2-7, 8-3, 15-11, 16-19, 7-2, 19-24, 2-7, 24-19. Forms the third diagram.
Diagram No. 3: 10-14, 19-24, 14-9*, 24-19, 9-5*, 19-24, 5-1*, 24-28, 6-10, 28-24, 10-15. Black Wins.
Game: 11-15, 23-19, 9-14, 22-17, 6-9, 17-13, 2-6, 25-22, 8-11, 29-25, 4-8, 22-17, 14-18, 27-23, 18-27, 32-23, 15-18, 23-14, 9-18, 24-20, 11-15, 17-14, 15-24, 28-19, 10-17, 21-14, 18-23, 25-22, 8-11, 22-18, 7-10, 14-7, 3-10, 26-22, 5-9, 30-25, 23-26---B, 18-15---C, 11-18, 22-15, 26-30, 25-21, 30-25, 15-11, 25-22, 11-7, 22-18, 7-3, 1-5, 31-27, 18-15, 27-24, 15-11, 21-17. Forms the first diagram. J. B. Macindoe, the Draught Board, April 1871.
A---Corrects W. Hay who continued; 9-14, 19-15, 11-18, 3-7. Drawn.
B---Forms No. 31 by W. Hay, the Draught Board, Aug. 1, 1869.
C---Hay stars this move. J. Donaldson in Draught Board, No. 159, Dec. 1870, shows 19-15 to lose, saying that this was hinted to lose by W. Hay.
W. Hay first gave the above position (Note B) as a draw. J. B. Macindoe then corrected Hay (see diagram at A), in the Draught Board, No. 96, March 1, 1870. W. Hay said he arrived at his position from an unpublished variation of the "Shuttle Game." He however did not give the game. Macindoe gave the above game in the New Series of the Draught Board, April 1871, Page 37.
The above positions may be found as No. 698, No. 144, and No. 168 in Lyman's Problem Book.
The Checker Maven is produced at editorial offices in Honolulu, Hawai`i, as a completely non-commercial public service from which no income is obtained or sought. Original material is Copyright © 2004-2026 Avi Gobbler Publishing. Other material is public domain, AI generated, as attributed, or licensed under CC1, CC2, CC3 or CC4 and the various CC options. Information presented on this site is offered as-is, at no cost, and bears no express or implied warranty as to accuracy or usability. You agree that you use such information entirely at your own risk. No liabilities of any kind under any legal theory whatsoever are accepted. The Checker Maven is dedicated to the memory of Mr. Bob Newell, Sr.