The Checker Maven
Jump to navigationA Lot of Work

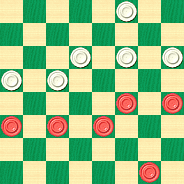
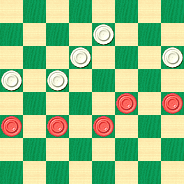
The two positions presented in today's Checker School column will present you with a lot of checker-related work, for not only are there two problems to be solved, there are four sample games and more than twenty explanatory notes to go through.
But good work bears its rewards, and if you take the time to study all of this material, then unless you're already a grandmaster, you'll definitely become a better player.
WHITE

BLACK
White Plays, Black Wins
W:W30,23,22,21,20,19:B14,13,12,11,10,1.
J. DRUMMOND
WHITE

BLACK
Black to Play and Win
B:W26,23,21,20,19:B14,13,12,11,10.
Work it all out, then click on Read More to see the solutions an a wealth of supplementary material.![]()
Solutions
Solutions, sample games, lettered notes, and unattributed commentary are from Ben Boland in Famous Positions in the Game of Checkers. Numbered notes are by the editor, using Ed Gilbert's KingsRow computer engine and 10-piece endgame database. There is so much material here that, if you're going to study it in detail, you might wish to print it out. To do that, click on Printer Friendly Version near the bottom of the page.
Diagram No. 1: 21-17-A,1 14-21, 22-18, 1-5---B, 30-26, 12-16*---2, 19-12, 21-25, 12-8---C, 25-30, 8-3, 10-15, 18-14, 15-18, 26-22---3, 18-27, 22-18, 30-26, 3-8, 26-22, 8-15, 27-31, 20-16, 31-26, 16-11, 26-23, 11-7, 22-17, 15-10, 23-26, 7-2, 26-22. 18-15, 22-18. Black Wins---4.
Diagram No. 2: 11-15, 19-16, 12-19, 23-16, 14-18, 16-11, 15-19, 11-8---D, 10-14---5, 8-3, 18-23---E, 26-22, 23-26, 3-7, 26-30, 7-11, 19-24---F, 11-15, 24-28, 15-19---G, 30-26, 19-15, 26-17, 15-10, 28-32, 20-16, 32-27, 16-11, 27-23, 11-7, 23-26, 7-2, 17-22, 10-17, 22-18. Black Wins.
Game: 9-14, 22-18, 5-9, 24-20, 11-16, 20-11, 8-22, 25-18, 4-8, 28-24, 8-11, 29-25, 11-16, 24-19, 7-11, 25-22, 10-15, 19-10, 6-15, 27-24, 16-20, 23-19, 14-23, 19-10, 20-27, 26-19, 9-13, 31-24, 2-7, 32-27---H,6, 7-14, 27-23---7, 3-7, 24-20, 7-10. Forms above position, diagram No. 1. Chas. Hefter vs. C. Freeman, American Checker Review, Vol. 5, 1893.
Game: 11-15, 23-18, 8-11, 18-14, 9-18, 24-19, 15-24, 22-8, 4-11, 27-20, 11-15, 25-22, 5-9, 22-17, 9-14, 29-25, 15-19, 25-22, 7-11, 26-23, 19-26, 30-23, 6-9, 17-13, 3-7, 13-6, 2-9, 28-24, 9-13, 22-18, 1-5, 18-9, 5-14, 32-28, 11-15, 24-19---I, 15-24, 7-11, 31-26. Forms Drummond's position, diagram No. 2, F. W. Drinkwater vs. Wm. Bell, Game 542, New England Checker Player, Vol. 5, Nov. 1880, No. 518 by Drinkwater (at 4th move of the above position). Drinkwater showed all variations, see history below.
Game: 11-15, 24-20, 8-11, 28-24, 4-8, 23-19, 15-18, 22-15, 11-18, 26-22, 7-11, 22-15, 11-18, 30-26, 2-7, 26-22, 7,11, 22-15, 11-18, 32-28, 10-14, 25-22, 18-25, 29-22, 9-13, 27-23, 8-11, 31-26, 11-15, 19-10, 6-15, 24-19, 15-24, 28-19, 1-6, 22-18---J, 6-10, 18-9, 5-14, 26-22, 3-7, 22-18, 14-17, 21-14, 10-17, 18-14, 17-22, 19-15---K, 22-25, 23-19. Forms Drummond's Position, at 8th move colors reversed. I. Corbett, Draughts World, Vol. 8, Dec. 1896.
Game: 11-15, 23-19, 8-11, 22-17, 9-13, 17-14, 10-17, 19-10, 7-14, 25-22, 2-7, 27-23, 6-10, 24-20---8, 4-8, 31-27---L,9, 10-15, 29-25, 15-18, 22-15, 11-18, 27-24, 18-27, 32-23, 1-6, 23-19---M, 8-11, 19-16, 12-19, 24-8, 3-12, 28-24, 6-10, 24-19, 17-22*, 25-9, 5-14, 26-23, 7-11, 30-26. Forms above position. Diagram No. 2. I. Wyllie.
A---Freeman continued; 22-18, 1-5, 18-9, 5-14, 30-26, Forming Diagram No. 2.
B---This corrects C. Hefter who gave this pretty draw: 13-17, 30-26, 12-16, 19-12, 10-15, 18-14, 21-25, 12-8, 25-30, 8-3, 15-18, 26-22*, 18-25, 23-19, 30-26, 3-8. Drawn.
C---23-19, 25-30, 26-23, 30-26, 19-15, 26-19, 15-6, 19-23. Black Wins.
D---Drummond continued; 11-7, 13-17, etc. Black Wins; If 20-16, 10-14, 11-7, 18-23, 26-22, 23-26, 7-2, 26-30, 2-6, 30-25. Black Wins. Hefter.
E---13-17, 3-7, 18-22, 26-23, 19-26, 7-10, 22-25, 20-16, 26-31, 16-11, 17-22, 10-26, 31-22, 11-7, 25-30, 7-2, 30-26, 2-6, 26-23, 6-9, 23-18. Black Wins by "First Position." J. Wyllie, see history below. This was also shown by I. Barker, No. 32, Vol. 5, American Checker Review, March 1, 1893.
F---30-25, 21-17. Draws.
G---22-17, 13-22, 15-10, 30-26, 10-17, 26-31. Black Wins. By 1st Position.
H---Probably the loser. 30-26 is better, though in 1900 Harry Freeman played 32-28 and drew. C. Hefter. Kear's Encyclopedia Page 341 shows; 30-26, 7-14, 26-23, 3-7, 24-20, 7-10, 32-28, 1-5, 28-24, 5-9, 22-18, 13-17, 19-16, 12-28, 23-19. Drawn. "Cowan's Coup." Chas. Hefter.
I---31-26, 15-18, 20-16*, 18-27, 26-22, 12-19, 24-6. Drawn. Drinkwater.
J---19-15, 3-7, 22-18, 5-9, 15-11, 7-16, 20-11, 6-10, 11-7, 12-16, 26-22, 16-19, 23-16, 14-23, 7-2, 23-26, 2-6, 9-14, 6-15, 14-18. Drawn. C. J. Murton.
K---To correct Murton, Game 603, Draughts World, Oct. 1896, who plays;
23-18, 22-26, 18-15, 26-31, 14-9, 31-27. Drawn.
L---The loser; 29-25 draws.
M---Bryden played 25-22 against Wyllie in the 20th game of their match, 1886, Dunne's Guide, Page 87 and Page 128 Gould's Match Book. This however is not the game Drinkwater refers to in his notes.
1---Other attempts to save the game don't work either. If 30-26 or 30-25 Black simply plays 11-15.
2---White was threatening 19-16. Black's move gives back his extra man but keeps the win.
3---3-7 or 3-8 don't work for White, for instance 3-7 18-27 7-16 and the exposed man on 26 is lost.
4---18-15 22-18 15-11 18-9 and White is out of the game.
5---Note that 10-15 only draws.
6---The computer evaluates this as a draw, not a loss.
7---This is the actual losing move; 24-20 draws.
8---31-27 certainly is better here. It takes deep computer analysis of the text move to show that White still has a possible draw, and a human player is certainly better off avoiding this line of play. Long evaluation with KingsRow scores the position at about +8, which indicates a very narrow Black advantage.
9---29-25 is White's best option. Black would retain a small advantage in a position that is hard to call even with a powerful computer engine.
F. W. Drinkwater in the New England Checker Player (see above game Drinkwater vs. Bell), wrote: This ending (4th Move of Drummond's position), turned up several times with me in different games, no doubt others have done the same. Mr. Wyllie has it, with the colors reversed, in an end-game from the "Doctor," at the 21st move of Problem No. 36, in the Leeds Mercury, and wins it same as Note E.
F. Dunne, No. 3, his "Draughts Player's Guide," 1890 has: Black5, 7, 12, 13, and White15, 20, 26, 31. White to Play and Win; 26-23, 5-9, 31-26, 9-14, 26-22, 14-17, 22-18, 17-22, now same as Drummond's setting, above, at 6th move, colors reversed.
John G. Corbett's correction of Chas. Hefter may be found in the "Guide Post," May 1903, Page 11, corrects No. 14 by Hefter. This however was not noted by F. Dunne in both his first and second edition (1905 and 1911), of his Praxis, Page 48, Note K, where Hefter's play is given. It may also be found as Game No. 73 and Problem No. 105, Stearns' Book of Portraits, Vol. 1, 1894. Also in the Third Scottish Tourney, Game No. 40, J. C. Brown vs. G. Buchanan. Corbett's play may be found in "Master Play of the Draught Board," Part 2, Page 105, Var. V. also "Familiar Themes," No. 4, Page 52 and No. 124, "Duffy's Standard Positions," Part 2, and Kear's Encyclopedia Page 342.
Diagram No. 2 by Drummond may be found colors reversed as No. 73, in his "Scottish Draughts Player," 3rd Edition, 1861. Drummond's solution was only up to Note D.
You can email the Webmaster with comments on this article.
