The Checker Maven
Jump to navigationPrinciples of Strategy

Checkers is sometimes compared to a war game, with the players taking on the role of opposing Generals, commanding their respective forces of Red and White warriors. Fortunately, this analogy only goes so far; although checker combat can be sharp and demanding, it is happily of a peaceful, intellectual nature.
But much as war has its well-evolved principles of strategy, checkers too is a game of a highly strategic nature (though tactics often come to the fore). Checker strategy, however, is a topic that has generally not been well elaborated in checker literature. Literally only a handful of books have dealt in-depth with this facet of the game.
One of these books is Principles of Strategy in the Game of Checkers, the only published book by the late Brooklyn champion Louis Ginsberg. Dealing with the critically important Dyke positions, and published over 65 years ago, the book remains relevant and vital today with its insightful notes and clear elucidation of strategic principles.
This little book has long been out of print, but today we are releasing a newly-typeset electronic edition, which you can download at once here. We owe thanks to a mysterious "Mr. T." who provided us with carefully corrected interpreted scans of the original and helped greatly in moving the project forward. The book is available in PDF format and can easily be printed on plain letter paper if you prefer hard copy.
Let's take a quick peek at one of the positions in the book. It arises from the following play. Notes are taken from the book; notice the remarkable clarity and insight the author provides.
11-16---A 24-20 16-19---B 23x16 12x19 22-17---C 10-15---D 25-22---E 8-12---F 27-24---G 7-10---H 20-16---I 2-7---J 32-27---K 4-8 27-23 9-14---L 30-25---M 5-9---N; forms diagram
A---The Bristol opening which often assumes a "Dyke" formation.
B---Black takes command of 19 and expects to develop the "Dyke" if the opportunity offers.
C---A weak move, but generally made by the uninformed. Again the importance of 22-18 is noted, for if Black has visions of the center, the man on 18 must be removed by the 9-14 exchange (10-14, although sound, leads to a complicated formation of a different nature).
D---Black begins to mass his pieces as shown in previous examples.
E---White must try to establish his position and break up the coming "Dyke."
F---This move must eventually be made to support the piece on 19. If 7-10, trying to establish the formation too quickly, White goes 20-16 and spoils the "Dyke" as pointed out in Example 1.
G---The ever present defense in these formations, to be followed by 32-27, when the time comes, as explained before.
H---The text move is given to illustrate how a strong formation can be wrecked. It is proper to go 4-8 for if 32-27 comes next, 7-10 and the "Dyke" is very strong. If White tries 20-16 after 7-10 then 3-7 is the key move for the attack, eliminating the trunk game.
I---Threatening square 11, explained in Example 1.
J---Black gets ready to attack the piece on 16, having in mind 4-8 followed by 8-11. If White plays 16-11, 7-16, 24-20, then 3-8, 20-11, 19-23, etc.
K---White's destination is 18.
L---It is quite evident something must be done to stop the impending attack against the man on 15.
M---Threatening the three for two. This type of move in similar positions should always be considered as a threat against 18, a strategic point.
N---Nothing else to be done.
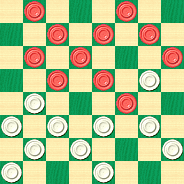
WHITE
White to Play and Win
W:W31,29,28,26,25,24,23,22,21,17,16:B19,15,14,12,10,9,8,7,6,3,1.
It's not as hard as it looks; can you break the Dyke or will the position hold water? It's up to you; solve the position and click on Read More to "leak" the solution.![]()
Solution
16-11---O 7x16 22-18 15x22 24x15 10x19 17x10 6x15 25x4---P White Wins---1
O---White removes a very important piece in order to get a very brilliant stroke which wins for White. This idea comes up in different forms and should be studied carefully.
P---This game has been won in actual competition across the board between experts.
1---Black's position is hopeless, for instance 1-5 4-8 9-14 8-11 16-20 23x16 12x19 26-23 19x26 31x22 5-9 22-17 14-18 11-7 3x10 17-14 10x17 21x5 and White wins easily---Ed.
You can email the Webmaster with comments on this article.