The Checker Maven
Jump to navigationD. Robertson, Clockmaker and Checkerist?

We looked for references to "D. Robertson," to whom today's Checker School studies are credited. We didn't directly find anything about this old-time checkerist, but we did find the beautiful old-time clock replica above, appropriately titled the "D. Robertson" model. Now, checkerist Robertson hailed from Scotland in the late 1800s. The clock above is a copy of a Scottish clock that, at least by appearance, may have dated from around the same time. Could D. Robertson, checkerist, have also been D. Robertson, clockmaker? We made some inquiries, but didn't come up with any clear answers. Still, the possibility is intriguing.
Once sold by a company appropriately called Timeworks, the above clock replica is, sadly, no longer in their catalog. In fact, the era of analog clocks itself seems to be passing; we're surprised at the number of younger people today who can't read anything but a digital clock. We could continue the theme by further waxing nostalgic about the heyday of checkers, but instead we'll get back on track and present Mr. Roberton's positions.
| D. ROBERTSON | D. ROBERTSON |
| WHITE | WHITE |
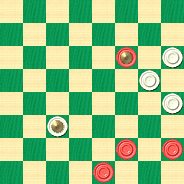 | 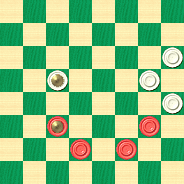 |
| BLACK | BLACK |
| Black to Play and Win | Black to Play and Win |
| B:W21,17,13,K11:BK22,6,5,2. | B:W21,K19,17,13:BK11,9,7,6. |
At first glance the positions look balanced, but White's group of three men on the left lacks mobility, and that's often a fatal flaw in checkers. Still, finding the win will require clockwork precision.
Now, this isn't a "beat the clock" speed position, so take all the time you wish before clocking your solution. Then move your hands (remember, it's an analog clock) to Read More to see the solutions, four sample games, and detailed notes.![]()
Solutions
Solutions and lettered notes are taken from Ben Boland's timeless classic, Famous Positions in the Game of Checkers. Numbered notes are by the Editor with the assistance of Ed Gilbert's KingsRow computer engine and 10-piece endgame database.
Diagram No. 1: 22-26---E, 11-15, 26-31, 15-18---1, 31-27, 18-15, 27-24, 15-18, 24-19, 18-22, 19-15, 22-26, 5-9---H, 26-23, 2-7, 23-27, 7-11, 27-24, 11-16 24-27, 16-19, 27-32, 19-24, 32-28, 15-19, 28-32, 24-28, 32-27, 28-32, 27-31, 19-23---F, 31-27, 23-18, 27-24, 32-23, 14-5, 18-14---G. Black Wins.
Diagram No. 2: 7-10, 19-23, 11-15, 23-26---2, 15-19, 26-22, 19-23, 22-25, 10-15, 25-22, 23-27, 22-26, 15-19, 26-22, 19-23, 22-25, 23-26, 25-22, 26-31, 22-25, 27-23, 25-22, 23-19, 22-25, 19-15, 25-22, 31-27, 22-26, 27-24, 26-23, 24-20, 23-26, 20-16, 26-23, 16-11, 23-26, 11-7, 26-23, 7-2, 23-26, 6-10, 13-6, 2-9, 17-13, 9-14, 26-22, 15-11, 22-26, 11-7, 26-23, 10-15, 23-27, 15-19, 27-32, 7-11. Black Wins---3.
Game: 10-14, 24-20, 11-15, 22-17, 6-10, 17-13, 1-6, 25-22, 14-18, 23-14, 9-25, 29-22, 15-19, 22-18---A, 12-16, 20-11, 8-22, 26-17, 10-15, 30-26, 4-8, 27-23, 8-12, 23-16, 12-19, 32-27, 7-11---B, 27-24, 11-16, 24-20, 3-7, 20-11, 7-16, 31-27, 15-18, 27-24, 18-22, 24-15, 22-31, 28-24, 16-20, 24-19, 31-27, 15-11, 27-23, 19-16, 23-19, 16-12, 20-24, 12-8, 19-15, 8-4, 15-8, 4-11, 24-27, 11-15, 27-31. Forms above position, Diagram No. 1, at 3rd Move. T. Wiswell. N. Y. Washington's Day Tourney, 1939.
Game: 11-16, 24-19, 8-11, 22-18, 10-14, 28-24, 16-20, 25-22, 7-10, 30-25, 3-7, 22-17, 9-13---I, 18-9, 13-22, 25-18, 5-14, 18-9, 6-13, 32-28, 11-16, 19-15, 10-19, 24-15, 4-8---S, 29-25, 1-6, 25-22, 7-11, 22-17, 11-18, 23-14, 13-22, 26-17, 6-10, 14-7, 2-11, 17-14, 11-15, 14-10, 15-18, 10-7, 18-22, 7-3, 22-25, 3-7, 8-11, 21-17, 25-30, 17-13, 11-15, 7-11, 15-18, 11-15, 18-22, 15-18, 30-25, 13-9, 25-29, 18-25, 29-22, 9-6, 22-18, 6-2. Forms above position, Diagram No. 1, at 3rd move colors reversed. E. Clark.
Game: 11-16, 23-18, 8-11, 26-23, 10-14, 24-19, 7-10, 28-24, 16-20, 22-17, 4-8, 30-26, 11-16, 32-28, 9-13, 18-9, 13-22, 25-18, 5-14, 18-9, 6-13, 19-15, 10-19, 24-15, 3-7. Same as above at S, Atkinson's Bristol.
Game: 12-16, 22-17, 16-19, 24-15, 11-18, 23-14, 9-18, 17-13, 10-14, 28-24, 8-11, 24-19, 4-8, 26-23, 6-10, 30-26, 1-6, 26-22, 11-15, 32-28, 15-24, 28-19, 7-11, 22-15, 11-18, 31-26, 3-7, 19-16---C, 8-12, 25-22---D, 18-25, 29-22, 12-19, 23-16, 10-15, 22-17, 14-18, 16-12, 15-19, 12-8, 7-11, 8-3, 11-16, 3-8, 18-22, 8-11, 22-31, 11-20, 31-24, 20-27. R. Duncan. This runs into a variation of Diagram No. 2. Problem No. 992 in Mt. Sterling (Ky) Advocate.
A---22-17 is published to draw.
B---3-8 was played to draw, Tom later noted the win by 7-11 against D. Cohen.
C---Encyclopedia plays: 19-15, 10-19, 23-16, 8-12, 26-22, 12-19, 22-15, 14-18, 25-22, 18-25, 29-22, 5-9, 22-17, 7-10, 15-11. Drawn. I. A. Buchanan.
D---To here the game was played between R. Duncan and J. Ricca, in first round of N. A. C. C. C. T. Rica played 23-19 and eventually lost. Duncan later pointed out the win by 19-16.
E---With White to play see "Wray's Position," game by W. Ryan; If 22-18, 17-14, 18-9, 21-17, 6-10, 13-6, 2-9, 17-13, 9-14, 11-7. Drawn. Although Robertson does not give this variation, one can see it is his by the first move of Diagram No. 1. After the first move (22-18), the position may be found by M. H. Brennan, No. 58, in the North American Checker Board, Vol. 1, Sept. 15th, 1896. Also Page 202, Jensen's Forced Checkers, an end game between J. B. Hanson and W. G. Hill.
F---Robertson here plays 19-15. Text is shorter route and is by E. Clark: 19-15, 31-26, 32-27, 17-14, 9-18, 26-23, 18-22, 28-32, 22-26, 32-27, 26-30, 27-23, 30-25, 23-26, 15-10, 26-23, 25-22. Black Wins.
G---Continue 5-1, 6-10, 1-5, 10-15, 5-1 (13-9, 23-18), 23-18, 1-5, now crown man on 15 and return, 15-10, 5-1, 10-7, 1-5, 18-15, 5-1, 15-10, 1-5, 10-6, 5-1, 7-10, 1-5,6-1. Black Wins.
H---15-18, 17-14, 18-9, 21-17, 6-10, 13-6, 2-9, 17-13, 9-14, 13-9, 14-18, 9-6, 5-9, 6-2, 9-13, 2-6, 10-14, 6-9, 14-17, 26-31, 18-22, 9-14, 17-21, 14-17, 22-26, 31-22, 21-25. Black Wins. E. Clark, No. 68, International Draughts Magazine, Vol. 2, 1889. From Game No. 48.
I---11-15 is published play to draw.
1---Note that White has not been able to move the man on 17 because of a 2 for 1 shot. For instance 17-14 6-10 14-7 2-18 Black Wins Ed.
2---23-27 is no better---Ed.
3---White's immobility on the side of the board has proven fatal. The Black king on 14 holds both the White men and the White king cannot rescue them. Black will crown the man on 19 and the two Black kings will hunt down the White king---Ed.
The above position, Diagram No. 1, may be found as No. 183 Gould's Problem Book. Diagram No. 2 was No. 517 in the Leeds Weekly Mercury, June 19, 1886. This in turn was taken from the Glasgow Herald. In the Mercury, the Editor gave this note: The solution given by the author was incorrect, Mr. C. Adamson was the only one who discovered the error, and in contributing the correction to the Herald he expressed the opinion that the position is one of the best he has examined for a long time. It may be found as No. 37 in Dunne's Guide, and in Horsfall's Problem Book, it is No. 352, credited to C. Adamson.
Diagram No. 1 with men on 12 and 20 arose in a game between A. Hynd and J. Fellows, English Tournament Games, 1909. Also Game 2444, Draughts World, Vol. 36, 1910.
You can email the Webmaster with comments on this article.